If you’re reading this right now, it’s because this site was built and deployed automatically by a self hosted Forgejo actions runner I spent the last weekend setting up and configuring. Here’s how I did it and what the docs don’t tell you.
First things first
Firstly, I needed my own Forgejo instance to host the repository for this site. I already had a homelab server I run several services on, so I decided to use that.
You might be wondering, why Forgejo? Why not GitHub Actions, or Gitea, or Gitlab CI/CD?
For starters, I am not a big fan of Github (nor its parent company, Microsoft) for a multitude of reasons that others have already written about much more extensively and eloquently than I would be able to. Secondly, Github seems to be having problems keeping their uptime stable at all during the last few months. I followed this series of incidents and decided that I’d take the opportunity to set up a self hosted git server and actions runner instead.
Initially, I defaulted to Gitea since I had already heard about it and seen it in action, so I went to spin up a docker container and get it running. This was simple enough, and in a few short minutes of following documentation I had a running instance of Gitea. However, I kept seeing the names Forgejo and Codeberg pop up in discussions about self hosted git servers, so I decided to investigate further.
This resulted in me finding out that, despite Gitea being open source, it doesn’t fully conform to the values I’d expect for a self hosted platform. There are documented incidents of the for-profit company that took over Gitea in 2022 giving SaaS clients advance notice about security vulnerabilities while self-hosters were left out to dry. This, along with issues around governance and ownership of software made me wary of Gitea.
So, after that I decided to look into Forgejo, and found it to be much more suited to my needs and beliefs, being a copyleft (GPL v3) licensed project managed by the non-profit Codeberg. So, I decided to migrate my Gitea instance to Forgejo.
This process was mostly just dragging and dropping then changing a couple of configuration settings, since Forgejo itself is a fork of Gitea and maintains a lot of interoperability with it. I won’t go deep into this process since it’s out of the scope of this post, but just know that having a running instance of Forgejo is a great way to self-host your own Git server, and is also a prerequisite to the CI/CD pipeline I’ll be describing in this post.
Configuring the runner
In case you don’t know, a runner (or node as Jenkins calls it) is an automated agent that can perform tasks for you. For example, it can run tests, build and deploy your code, and more. It can be a physical machine, a virtual machine, or a container.
Keep in mind that it’s not recommended to host the runner in the same machine as Forgejo itself, it’s usually safer to have a ‘remote’ runner that can be controlled from the Forgejo instance.
In this particular case, I decided to stick to a docker based runner. The Forgejo docs have a decent example of a docker-compose.yml file that can be used to run a docker based runner. In my case, I had a little grief caused by search engines directing me to an outdated version of the docs (which included a CLI-centric runner registration process that is now deprecated), which I had to dig through to find the latest version of.
To save you the trouble, here’s the link, and here’s the docker-compose.yml file I used:
services:
  docker-in-docker:
    image: docker:dind
    container_name: 'docker_dind'
    privileged: 'true'
    command: ['dockerd', '-H', 'tcp://0.0.0.0:2375', '--tls=false']
    restart: 'unless-stopped'
    deploy:
      resources:
        limits:
          memory: 2g
          cpus: '1.5'
        reservations:
          memory: 512m
    networks:
      - runner


  runner:
    image: 'data.forgejo.org/forgejo/runner:12.10.2'
    links:
      - docker-in-docker
    depends_on:
      docker-in-docker:
        condition: service_started
    container_name: 'runner'
    environment:
      DOCKER_HOST: tcp://docker-in-docker:2375
    # User without root privileges, but with access to `./data`. The './data' directory must be owned by this same user.
    user: 1001:1001
    volumes:
      - ./data:/data
    restart: 'unless-stopped'
    networks:
      - runner

    command: forgejo-runner daemon --config /data/config.yaml

networks:
  runner:
    external: true
Let me walk you through each section:
services: This section defines each service that the file will run.docker-in-docker: This service runs the Docker daemon in Docker, allowing you to create ephemeral containers that we use to run jobs.resources: This section allows you to set limits on the resources that each service can use.
Since my VPS is pretty lightweight and I have modest needs, I set the memory limit of the runner to 2GB and the CPU limit to 1.5 cores, but you can adjust these values according to what you need. The reservation section allows you to reserve resources for the services, so they don’t compete with the host for resources.
runner: This service runs the Forgejo runner, which is the wrapper responsible for orchestrating job execution.
I pinned the runner service to version 12.10.2 to keep watchtower from updating the container mid-job and botching the execution, but you can update it to the latest version if you need to.
networks: This section defines the networks that the services will use. In this case, we’re using an external network calledrunnerto give the services internet access for pulling images and build dependencies.
External networks need to be created before they can be used by services. Do this with the
docker network createcommand.
Maybe you’re wondering why the example in the Forgejo docs uses Docker-in-Docker instead of running the Docker daemon directly on the host. Primarily, having an isolated environment that we can spin up on demand and then destroy once we’re done without touching the host is an important security measure that can help you prevent attacks that target CI/CD pipelines like the recent Tanstack incident.
Once we have this file, we can run docker compose up -d to start the runner and docker compose down to stop it.
However, we still need to register the runner itself in order for Forgejo to know where to send jobs.
Runner registration
Forgejo v15 introduced a new runner registration flow to replace the old CLI driven one. You just need to open the site administration panel, go to Actions > Runners, and click the Create new runner button on the top right.

Keep the credentials you’ll generate here somewhere safe, you won’t be able to see them again once you leave the page. If you lose them, you’ll need to delete the runner and register it again.
Here, you’ll get a chance to choose a name for your runner and give it a description. Once you do, Forgejo will generate a registration token and a UUID for you to use in the runner configuration file.
Next, you’ll want to create a configuration.yaml file that’ll hold all the settings for your runner. This includes the registration credentials you just generated.
Here’s an example configuration.yaml file:
runner:
  capacity: 1
  labels:
    - node-22:docker://node:22-bookworm-slim # You can add multiple labels here

container:
  privileged: false

cache:
  dir: /data/.cache

server:
  connections:
    forgejo:
      url: https://yourforgejohost.com/
      uuid: someuniqueid
      token: claudewillleakthisforyou
Here’s what each section does:
capacity: The number of concurrent jobs the runner can handle.labels: A list of labels that the runner can use to identify itself to Forgejo.
This is important, without any labels Forgejo won’t know which jobs the runner can handle, so make sure to include at least one. This will define which docker image the runner uses to run jobs. For more information on labels, see the Forgejo documentation.
privileged: Whether the container should be privileged or not. This has a lot of security implications regarding elevated linux capabilities and access to host devices, so keep it off unless you absolutely need it.cache: The directory where the runner will store cache data.server: The Forgejo server that the runner will connect to. This is your Forgejo instance’s URL.
Save this file to the data/ directory that the service mounts as a bind mount, and you’re good to go.
Running the runner
Once you start your container, the runner should show up in the Forgejo UI as an idle runner.

If the dot is red, something went wrong and the runner cannot connect to the Forgejo server. Check the runner’s logs with
docker logs <container_id>to see what’s going on.
Now, we just need to define the actual jobs the runner will perform.
Workflows
The way Forgejo defines jobs is through the .forgejo/workflows/ directory in your repository.
Here, we can define a workflow.yml file to describe what we want the runner to do. Here’s what I use for my personal website. It defines a single job that runs on a Node.js 22 Bookworm slim container, checks out the repository, and builds the website using Hugo before using rsync over ssh to deploy it to an nginx watched static site directory.
on:
  push:
    branches: [main]

jobs:
  deploy:
    runs-on: node-22
    steps:
      - uses: actions/checkout@v6

      - name: Install Hugo
        run: |
          apt-get update -qq && apt-get install -y curl rsync openssh-client
          curl -L -o hugo.tar.gz https://github.com/gohugoio/hugo/releases/download/v0.162.0/hugo_extended_0.162.0_linux-arm64.tar.gz
          tar -xzf hugo.tar.gz hugo
          mv hugo /usr/local/bin/

      - name: Build
        run: hugo --minify

      - name: Configure SSH
        run: |
          mkdir -p ~/.ssh
          echo "${{ secrets.DEPLOY_SSH_KEY }}" > ~/.ssh/id_ed25519
          chmod 600 ~/.ssh/id_ed25519
          echo "${{ secrets.DEPLOY_HOST_KEY }}" > ~/.ssh/known_hosts

      - name: Deploy
        run: |
          rsync -avz --delete -e "ssh -p 22" \
            public/ ${{ secrets.DEPLOY_USER }}@${{ secrets.DEPLOY_HOST }}:/some/directory/in/the/prod/server/
This is just an example, don’t use it as-is in your own workflows.
The syntax might be familiar to anyone who has used GitHub Actions before. Let me explain what each part does.
on: Defines the trigger for the workflow. In this case, it triggers on pushes to themainbranch.jobs: Defines the actual jobs to be performed.deploy: The name of the job.runs-on: Specifies the runner to use. In this case, it uses thenode-22image.
Remember how I said that labels are important? This is why, the job will only run on runners that have this label.
steps: Defines the individual steps to be executed.uses: Specifies an action to use. In this case, it uses theactions/checkout@v6action to check out the repository.
Actions in this context are reusable units of code you can define in your own repos, a public repository or elsewhere. For more information, here’s the Forgejo documentation.
name: The name of the step.run: The command to execute.
You can do anything you want here. Keep that in mind before you accept a merge request that messes with your workflows, or you’ll be executing arbitrary code on your runners.
Additionally, you might notice that I’m using some secrets to configure the SSH connection. You can configure these secrets in your repository settings under Actions > Secrets.
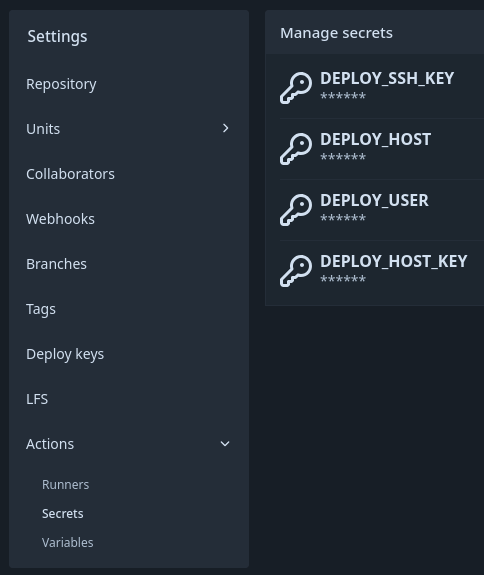
Once they’re there, Forgejo will automatically inject them into your workflow as environment variables with the syntax ${{ secrets.YOUR_SECRET_NAME }}.
Important: Treat these secrets the same way you’d treat a password. Never commit them to your repository, never log them to the console, and (ideally) never send them over to anyone. That’s what the secrets are for: to keep sensitive information out of your codebase. Additionally, always review any PRs that modify your workflows and make sure the secrets are being treated correctly. You’ve been warned
The big moment
Now, once you push any changes to the main branch, Forgejo will automatically run your workflow, and anything you defined in your jobs. You can check the progress and results of your workflow in the Actions tab of your repository. If the workflow fails, you can click on the job to see the logs and debug what went wrong.

Trust me, the first couple of runs will be spent debugging your workflow until you get the hang of it.
You can also define actions to be performed on other branches. For example, you can set up a separate workflow to run tests and static analysis on staging or develop branches before merging into main.
Conclusion
And that’s it! You now have a fully automated CI/CD pipeline using Forgejo. You can now enjoy performing any number of automated tasks without ever leaving your terminal, just by pushing code.